Managing Studies Post-Upload
Contents
Using the Bulk Study Update Feature
This powerful feature allows Project Administrators to modify data for existing studies in bulk after they have been uploaded. It’s useful for:
- Adding or correcting
PDFRelativePathinformation (e.g., for the two-stage PDF workflow). - Adding or correcting
CustomIDvalues. - Uploading or modifying screening decisions made outside of SyRF (or correcting existing ones).
How to Access Bulk Update
- Navigate to Studies -> All Studies.
- Click the Bulk study update button in the page header, beside Add New Systematic Search.
The button appears only if you have permission to bulk update studies in this project. It used to live in the three dots menu (…) above the study list; it is now a page action, so you no longer need to open that menu to find it.
Preparing Your Update File (CSV)
- Create a CSV File: You’ll need a new CSV file specifically for the update.
- Required
studyIdColumn: This file must include a column named exactlystudyId. Each row should contain the unique SyRFstudyIdof a study you wish to update.- How to get
studyIds: The easiest way is to export your current study data from SyRF. Go toData Export->Bibliographic. Untick the option “SyRF systematic search import compatible format”. ClickDOWNLOAD DATA. The exported CSV file will contain thestudyIdcolumn along with other bibliographic data.
- How to get
- Include Only Columns to Update: Besides
studyId, your update file should only contain columns for the data you intend to change. For example:pdfRelativePathcustomId- Columns for screening decisions (e.g.,
Screener_Alice_TitleAbstract,Screener_Bob_FullText). - Important: Remove all other bibliographic columns (
Title,Authors,Year, etc.) from the file you exported to get thestudyIds. Only keepstudyIdand the columns you are actively updating.
- Enter Update Values:
- For
pdfRelativePathorcustomId: Enter the new value in the corresponding cell for eachstudyIdyou want to modify.Warning: Providing an empty/blank cell for
pdfRelativePathorcustomIdin the update file will erase any existing value for that field in SyRF for that study. Only include rows and provide values for studies you intend to change. - For Screening Decisions:
- Use column names you can recognise (you’ll map them later).
- SyRF accepts several ways of writing an include or exclude decision, so you can upload a CSV from another tool without normalising the values first. All values are case-insensitive:
- Include:
1,include,included,yes, ortrue - Exclude:
0,exclude,excluded,no, orfalse
- Include:
- Note: Blank cells in screening decision columns are ignored during the update; they will not erase existing decisions. However, a value that means include or exclude will overwrite any previous decision made by the same mapped user for the same study across any screening stage.
- If a cell contains a value that isn’t recognised, the bulk update will stop with an error message that names the row, the column, and the values SyRF was expecting. Fix the file and retry.
- For
Upload and Mapping Process
- Choose File: In the “Bulk study update” dialog, select your prepared CSV update file.
- Column Mapping:
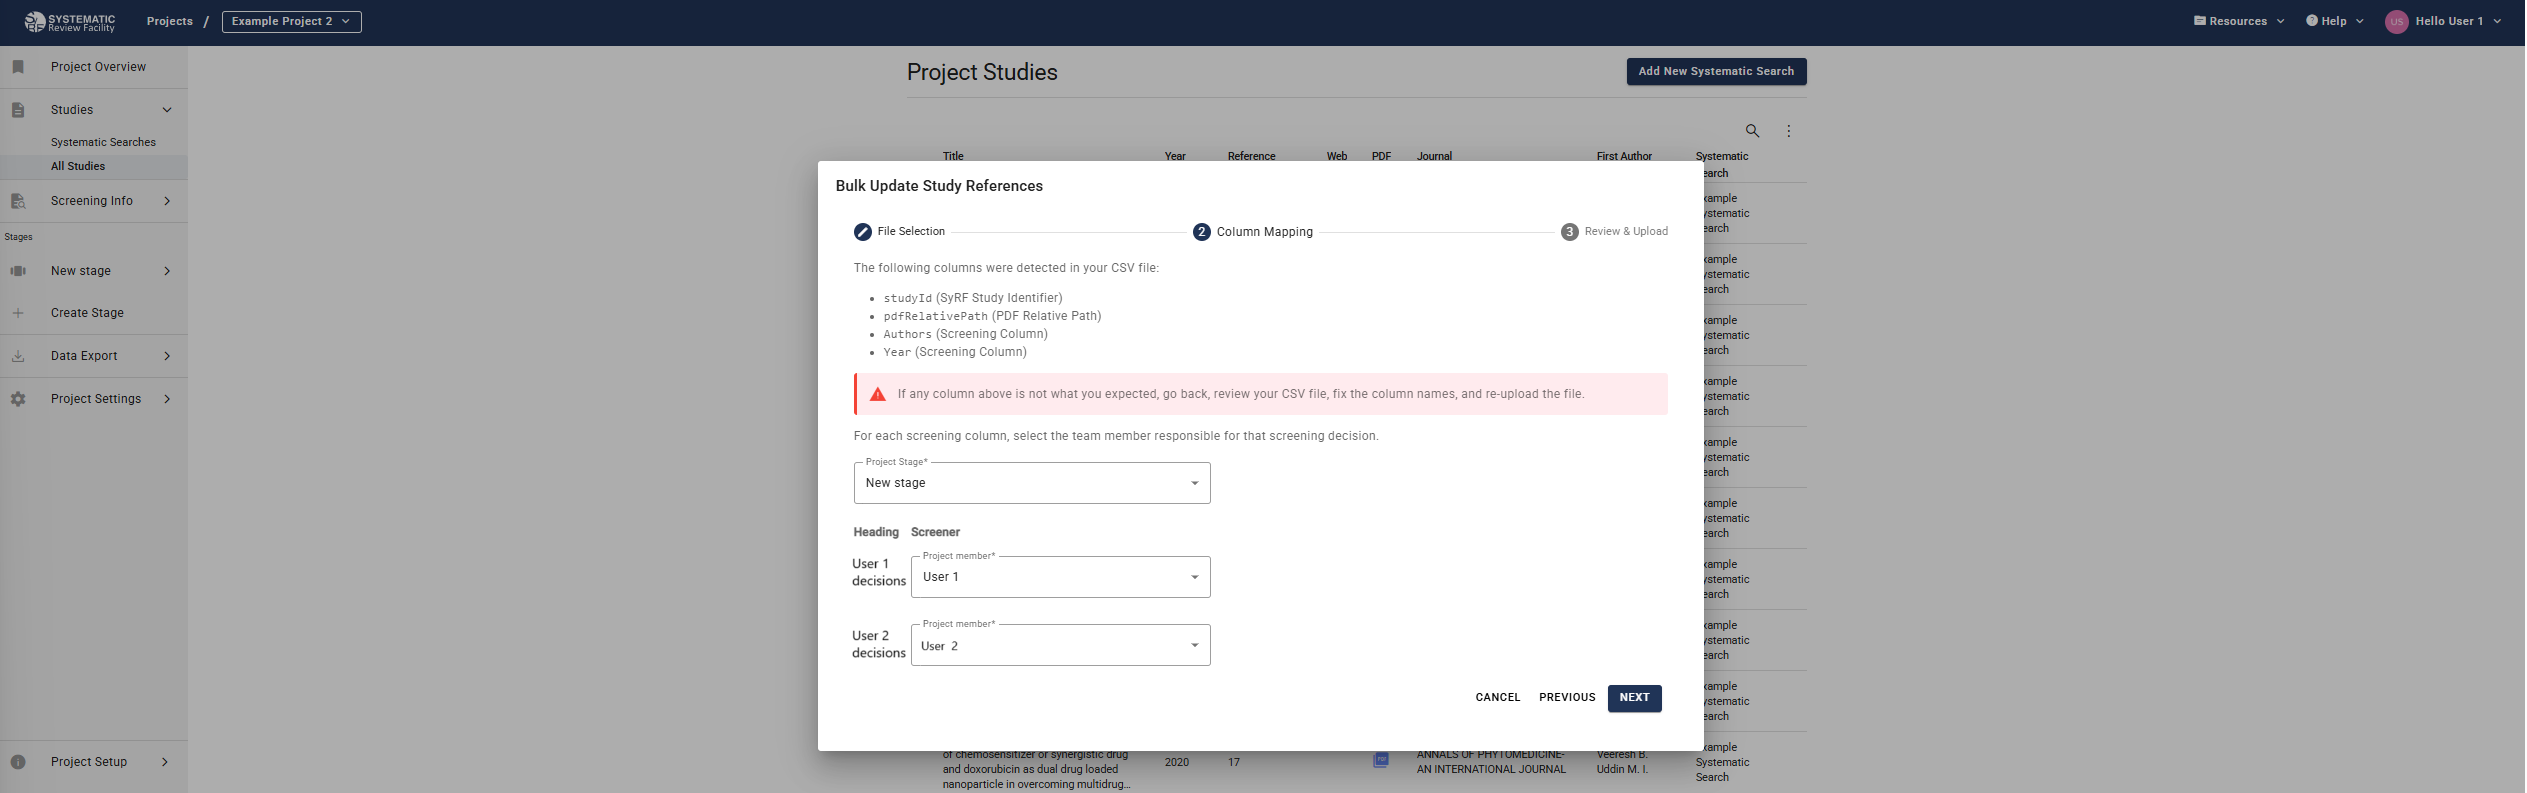
- SyRF will display the columns it detected in your CSV. Review this list carefully. If unexpected columns appear, cancel the upload, correct your CSV file, and try again.
- If you included screening decision columns, you must map each one to the corresponding Project Member and the relevant Screening Stage (e.g., Title/Abstract, Full Text).
- Review and Confirm Upload:
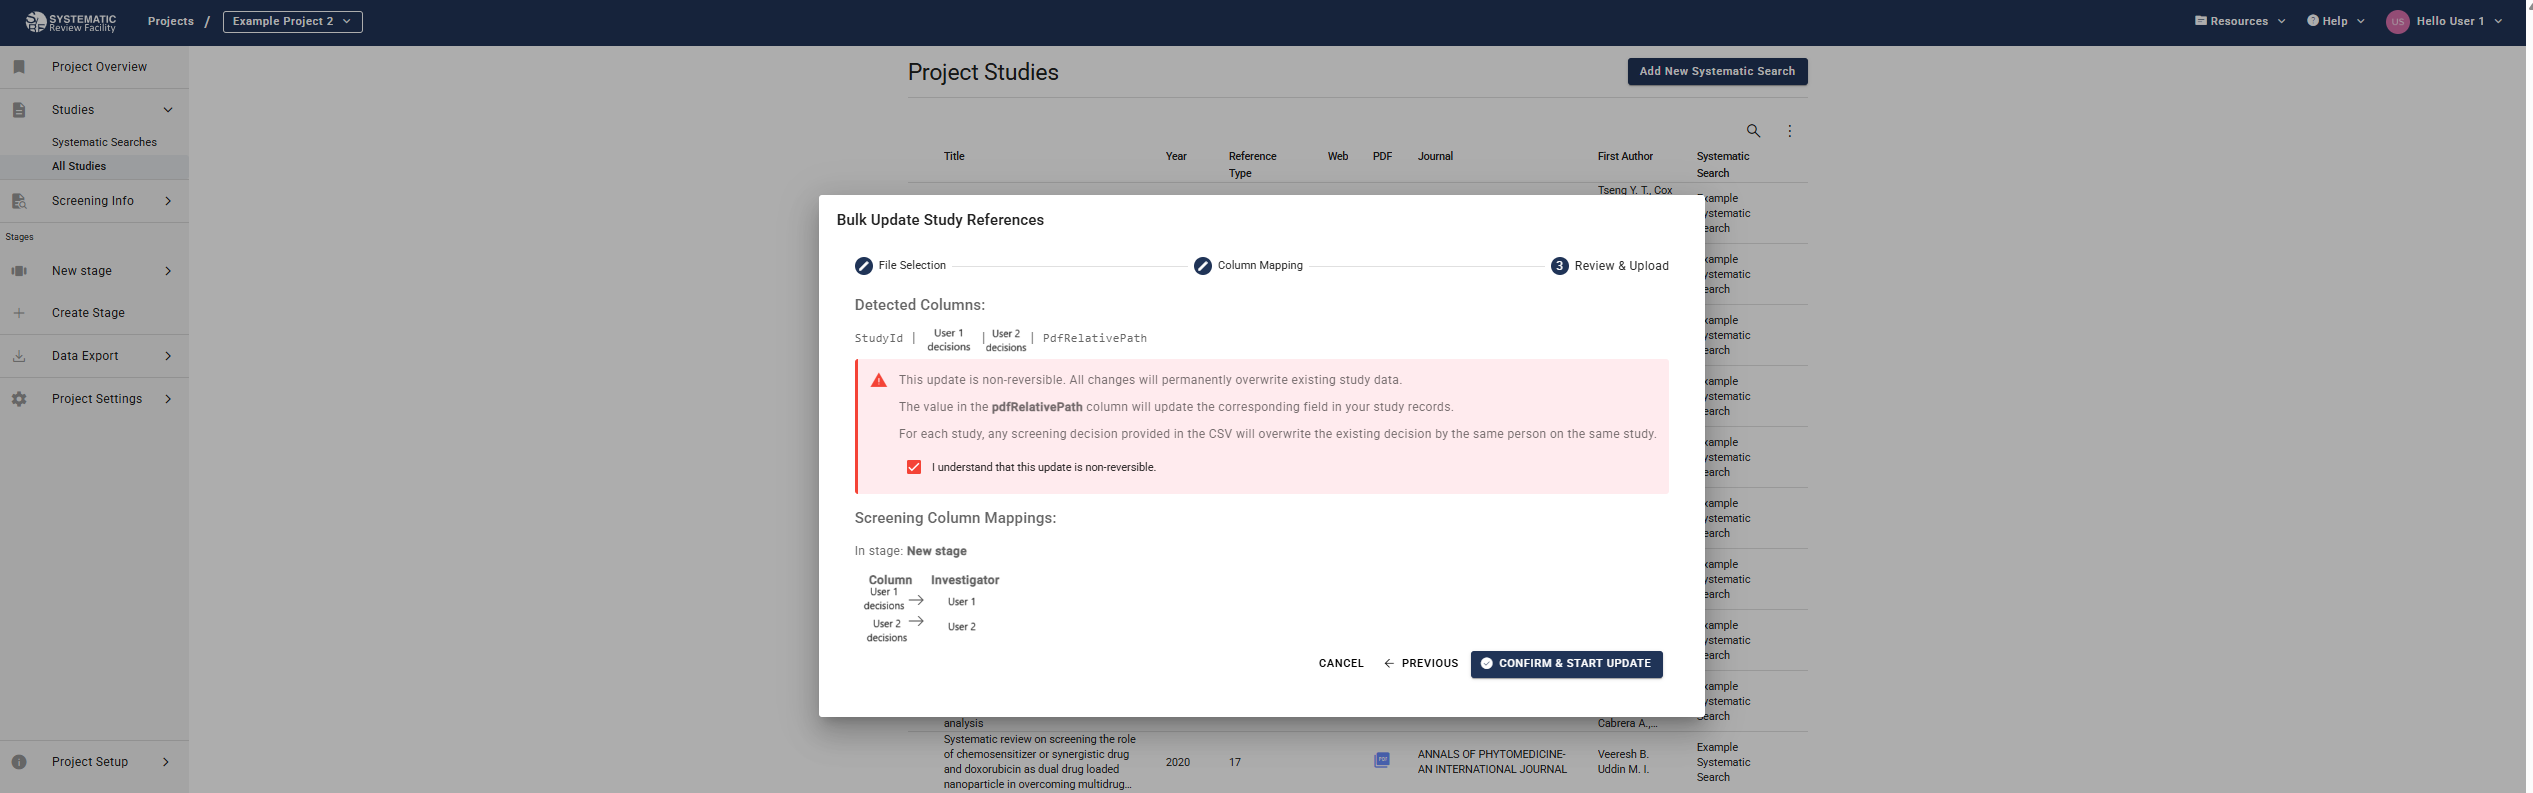
- A final confirmation screen summarizes the detected columns and the screening decision mappings you’ve made.
- Read the warnings on this page very carefully before proceeding.
Critical Warnings for Bulk Update:
- Irreversible Action: Bulk updates cannot be undone. Changes made are permanent. Double-check your update file and mappings.
- Overwriting Data (
pdfRelativePath,customId): Any data present in your update file for these columns will overwrite the current data in SyRF for the specifiedstudyId. - Erasing Data (
pdfRelativePath,customId): Providing a blank cell for these columns in your update file will permanently delete any existing data for that field in SyRF. - Screening Decisions: Decisions (
1or0) in your update file will overwrite existing decisions made by the same user for the same study and same stage. Blank cells in screening columns are ignored and do not erase existing decisions.
- If everything is correct, confirm the upload.
Following the Update After You Close the Dialog
Once an update is running you can close the dialog and carry on working. A summary strip under the All Studies heading keeps showing the project’s current or most recent bulk study update, and it survives navigating away, refreshing the page, or signing in from another browser — the state comes from the server, not from the dialog.
The strip reports only what SyRF can prove:
- Status and progress. A progress bar shows real numbers when the server reports them, and otherwise says that progress is not yet measurable rather than animating a figure it does not have.
- Result. When the update finishes, the strip says how many of the matched studies were actually changed. An update that matched studies but changed nothing says No studies changed — that is a real result, not an error. If the server did not produce a result, the strip says Result not available rather than reporting zero.
- Who and when. The person who started the update and the time it last changed appear where they are known. Where SyRF has no record, it says Not available instead of showing a placeholder date.
- Errors. The first ten retained problems are listed alongside the full error total when the server provides it. Show all expands the retained sample; the total can be larger than that sample.
- Upload interrupted. If the file never reached the server before the secure upload window closed, the strip says the update can no longer complete and asks you to start a new one, rather than showing an upload still in progress.
Clicking Bulk study update always starts a new update — it does not reopen or resume the run shown in the strip. To follow an update that’s already in progress, watch the summary strip itself, or, where your project has the Processing page enabled, follow its View in Processing link.
Deleting an Entire Systematic Search Upload
Project Administrators can remove an entire Systematic Search upload and all associated data from the project.
How to Delete
- Navigate to Project Settings (usually accessed via a gear icon or link in the project header or navigation).
- Find the section related to Systematic Searches or Data Management. [Note: Exact location might vary slightly based on SyRF version - adjust if needed]. Look for a list of uploaded Systematic Searches with a delete option.
- Locate the Systematic Search you wish to delete and use the corresponding delete button/icon.
Extreme Warning: Deletion is Irreversible
Deleting a Systematic Search is a permanent action and cannot be undone. This action will remove:
- All studies that were part of that specific upload.
- All screening decisions (title/abstract, full text) associated with those studies.
- All data extraction/annotation answers associated with those studies.
Exercise extreme caution before deleting a Systematic Search. Ensure you are removing the correct item and understand the consequences.
Related Pages
- Preparing References - How to prepare your reference files
- Upload Search - How to upload your systematic search
- Managing PDFs - How to add and manage PDF files
- View Studies - How to view your uploaded studies